Needed:
-Download standard moodle package: http://download.moodle.org/
-Sign up in a free hosting sever:
Suggested: http://www.000webhost.com/362917.html
-FTP client for upload file to our hosting server.
Suggested: http://filezilla-project.org/download.php
FOLLOW THESE SIMPLE STEPS AND IMAGES
-DOWNLOAD standard moodle package in: http://download.moodle.org/
Look at image and make sure that is standard package and
in this case the last version.

-SIGN UP in free hosting server like:

Where is the arrow will be the name of your subdomain (your website).

-CREATE a database on our remote server:
Access to our Control Panel (CPanel To Go)

Access MySql

Example:
MySQL database name: | a5238958_moodle |
MySQL user name: | a5238958_admin |
Password for MySQL user: | |
Enter password again: |

-Unzip standard moodle package and upload it to our server.
When you unzip the folder will remain "moodle".We need to get this folder in our server in the folder "public_html" using Filezilla.
You must create a folder called "moodledata" on our server in the same directory in which this "public_html" with 777 permissions.
For permission make right click on the folder, file permissions ... Numerical Value: 777

In my case for this example: http://testmoodle.site50.net/
Once in our subdomain click on the moodle folder.


Dirección Web | http://testmoodle.site50.net/moodle | ||
Directorio Moodle | /home/a4327158/public_html/moodle | ||
Directorio de Datos | /home/a4327158/moodledata |

If you dont' want to appear default.php, you have to upload files from moodle folder directly to the public_html folder so installation will be in a higher level.
Then the route would look like:
Then the route would look like:
Dirección Web | http://testmoodle.site50.net | ||||||||
Directorio Moodle | /home/a4327158/public_html/ | ||||||||
Directorio de Datos | /home/a4327158/moodledata |
You must enter the data of the database we have created earlier.

You have to be confirming a few pages.
If we get this image;

We continue to confirm the configuration pages database.Tables are being created to store all data.
Recommendations:
-Wait until the page is loaded completely and leave the button to continue.
-If for some reason get any errors while creating the tables
go to phpMyAdmin and delete everything and start to create the tables again.
IF ANY ERROR SUCCEED WHILE CREATING TABLES FOLLOW THESE STEPS.
IF ALL HAS BEEN PROPERLY SEE BELOW TO GO TO THE LAST STEP.
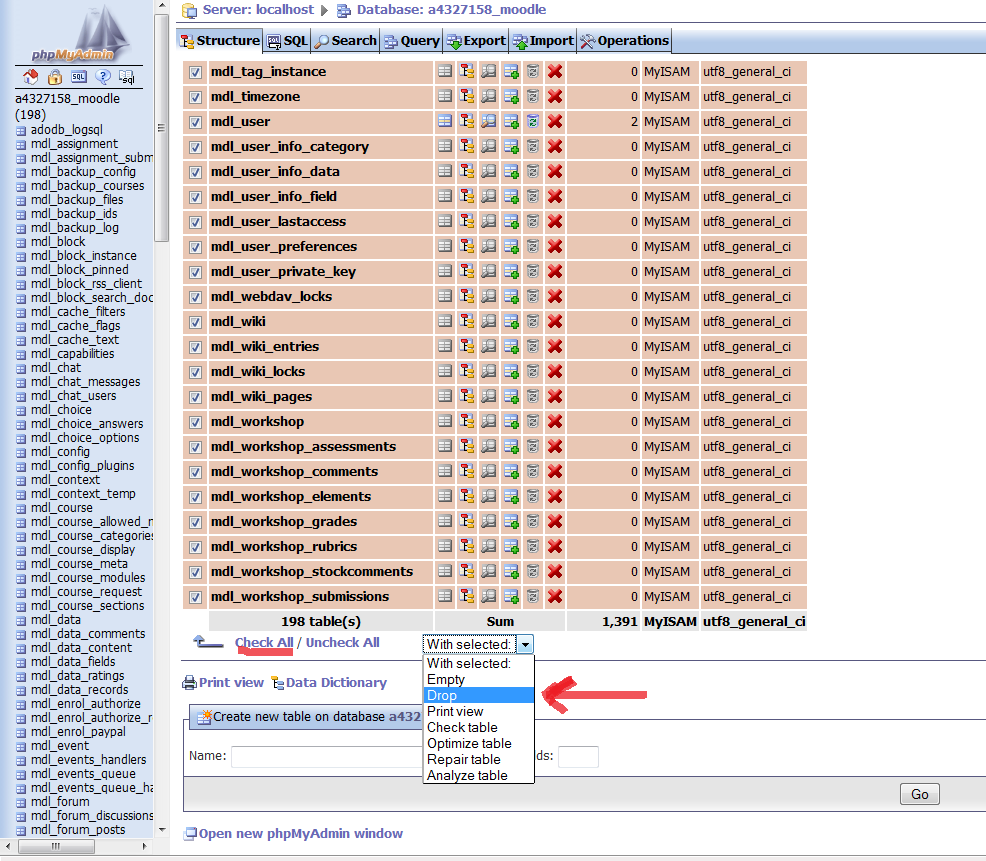
How to erase everything?
Go to:

Then enter in the administration of our database:

Then select all tables and select the option DROP (delete):
Finally confirm you want to remove:

CONTINUES HERE.
To reach the last step, set the administrator account:
Only need to enter the data it asks.
END OF TUTORIAL.